skip to main |
skip to sidebar
First off, you gotta check out Emily's Not So Idle Hands blog and see where I got my inspiration! Here is the project she shared that I just had to give a try! I've never used etching cream before but thought it would be a fun project idea to use for gifts. Come to find out...I'm gonna need some more practice! LOL Here is my first try:


I bought a vase awhile back for this very type of thing. I wanted to etch a "C" on it for my mom-in-law and after I practiced on the frappucino glass, I thought I could handle the vase. The bummer is that I used chipboard and there was just enough space that some of the etching cream went underneath so it looks sloppier than I'm ok with. Turns out I'll be keeping this vase and using it to hold my glittery pens! :)


On another note, my baby girl's 2nd birthday is fast approaching. Ok, ok, it really isn't until July but as I learned last year, it sneaks up on me and catches me when I least expect it! :) This year I vowed to get a jump start so that I could do more of the handmade decorations that I've done in the past for my son. A friend of mine that I went to high school with has an older sister that makes AMAZING buttons. You HAVE to check out her blog The Button Shop. Tessa is amazingly fabulous and I drool over her work on a regular basis. Well, she made a set of buttons that became the inspiration for Tatym's birthday party theme, which is Little Birdies. After I saw this set I asked her to make a set for me as well and she totally did! I am beyond in love with them! Check these out:


Aren't they fabulously amazing?!? The big buttons are the size of quarters and the small buttons are the size of dimes. I plan on using them when I make Tatym's birthday scrapbook page and maybe use them on a birthday tutu as well! Tonight I sat down to start making the birthday party invitations and this is what I came up with:


As Tatym's birthday gets closer and we settle on a party date and time then I'll fill in the rest of the information. I made 3 invites tonight and each one is a little bit different, that's the fun of handmaking them, no two are exactly alike!
Well, it's after 1am and I should be getting to bed. My aunt and 2 younger cousins are coming to town for the week and we have lots of fun things planned, a picnic at the park, a day at the beach, a tour of an old style merchant ship and maybe a trip to a farm to watch the birth of lambs...fun fun fun!!! Have a great spring break!!
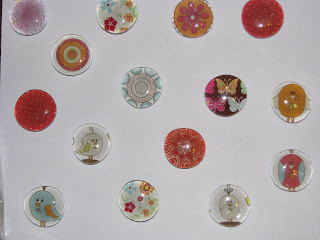
 Tonight my project was making magnets! I found some clear, round, glass rocks at JoAnn's. Make sure you get ones with a flat bottom. These are super easy, super cute and make for great gifts and fun for the kids! I just looked through my scrapbook paper and even made good use of some of my scrap pieces. I set the rock on top of the image I wanted on my magnet, traced a circle around the edge, cut it out (cut inside the line for a better fit) and used my CTMH liquid glass to adhere the paper to the rock. Once the liquid glass was dry, I used my exacto knife to trim off the excess paper from around the edge of the rock and then super glued a magnet to the back of the rock and BAM...we have a handmade magnet!
You can click on the picture to enlarge it for better detail. I LOVE the little bird ones...super cute and I know my kids are going to love them!

It's kind of a dreary day on the Oregon coast and I wanted to find something fun for the kids and I to do so I looked online and found some recipes for making our own bath crayons and paint! PERFECT! Just as I was getting ready to write the recipe down my wonderful friend, Sara, text me to see what I was doing so I invited her and her 5-year-old daughter, Karis over for a playdate! Let me just warn you...this stuff is MESS-Y!! If you are a neat freak or get anxiety from having any sort of mess...don't try this at home! LOL
The crayons didn't turn out as good as I'd hoped, I think it's definitely one of those recipes that I have to try out a few times in order to get the kinks out but hey, we all had fun so that's what counts!
What you need for bath crayons is:
Two 3.1oz Bars Ivory Soap (all I used was 1 4.5 oz bar)
Cheese Grator
1 Tbsp Vegetable Oil
3 Tbsp Water
2 Tsp Food Coloring
Wax Paper
Here are the directions:
1. Grate the bars of soap using the smallest hole on your cheese grator
2. Place the soap shavings, vegetable oil & water in a saucepan
3. Heat the ingredients on med-low. Stir constantly with a spoon until the soap melts and the mixture is doughy
4. Mix in the food coloring
5. Remove from heat
6. Spoon the soap out of the saucepan and onto a plate or baking pan. Soak the saucepan and spoon in hot water ( do it right away or it will never come clean )
7. When the soap is cool enough to handle , knead it with your hands for aprox. 1 minute
8. Divide the soap into 4 sections ( or 2 sections for chunky crayons )
9. Roll the soap into log shapes, then roll a piece of wax paper around each log
10. Put the crayons into the fridge to harden ( aprox. 1 hour )
Be sure to wash out the bathtub after the kids use this so it doesn't stain.This is where I got the recipe!
Here are my wonderful assistants kneading the soap mixture and preparing to roll them into little crayon shapes:


Now onto the paint portion of our show! LOL This one was ULTRA, SUPREME messy but Karis kept saying how much fun she was having and that just makes the mess worth it!
What you need:
2 Tbs. cornstarch
1/4 cup hand/dishsoap
4-5 drops of food color
1 tbsp water
We used a muffin pan for this so we put the cornstarch, soap and food color in each muffin cup, mixed them together. The consistancy is kind of like slime so I used a spatula to scoop it out of the muffin cup and put it into a sandwich bag and then added the water and squished it all together. VIOLA...it's ready to be used!


This would be a great gift to give to friends or kids in your family and I'm pretty certain that next time I won't be using a muffin pan, I'll just mix them in bowls or cups or something so that things aren't spilling over the sides! LOL An adult can make it a lot less messy but the kids have a blast and hey, it's soap so it's easy to clean up! :)


