Friday, January 29, 2010

Pinewood Derby Treat


Tomorrow our Pack is having our Pinewood Derby and we've all been asked to bring a snack to share with everyone and I just so happened to see THIS POST from my new favorite blogger and knew it was perfect for our event!

I was told we have about 20 kids in our Pack and to just plan on making 30-40 treats so I went ahead and made 40 of these sweet treats! I wanted to add a flag to each one but we're pretty much out of printer ink so I gave up on that whole idea!

So, here they are in all their glory! LOL

Lollipop Cookies & Ice Cream In A Bag...OH MY!

Today I watched 2 of my friend Brenda's kiddos so I wanted to plan something fun for them to do to occupy some of their time. I've been wanting to make the Lollipop Cookies for awhile and also came across the recipe for the Ice Cream In A Bag so viola...our plan for the afternoon! I'm going to do this the lazy way and just let you go HERE to check out the recipe for the Lollipop Cookies. Her pictures are way better than mine but I'll add some of mine to spice up the posting anyways! :)


Next on the list is the ice cream!! Again, go HERE to see the recipe and much better pictures. Can you tell I'm totally in LOVE with Amy and her blog?? She has soooooo many great crafts and recipes and what not. Maybe I could start a blog and do every one of her crafts and blog about it like Julie & Julia! LMBO!!! Totally kidding...maybe! Anyways, here are some of our pictures. We added oreo cookies to one of the bags of ice cream and the boys opted to have crushed candy canes in theirs! Both were DE-LICIOUS!! **SIDE NOTE** Make sure you wear gloves when you are doing this fun little project! We didn't at first and our hands were FREEEEEZING and hurting. The kids gave up and I went and got on a pair of gloves and finished them up!


Yay, co-op is starting again!


Our homeschool co-op is starting the newest semester next Friday and being the procrastinator that I am, I'm just now getting my lesson plans together. I've had this awesome preschool curriculum from Funshine Express since 2007 and it's come in handy for my PreK/K class. The picture above is of some of the games that came with the curriculum that I'm coloring and cutting out and getting ready for my preschoolers. If you are looking for PreK curriculum, definitely check out Funshine Express. I definitely plan on ordering another year of curriculum from them once Tatym turns 3. I guess now they even have a curriculum for babies but that's not for me! :) That seems a little nuts to me to buy school curriculum for a baby but to each his own and whatever floats your boat, right?! LOL Anyways, I'm super super super excited to be starting co-op again!!!!

Wednesday, January 27, 2010

CAKE BALLS!!!

Phew, it's been a busy day for me today! (See the 2 previous posts from earlier in the day.) I saw these red velvet cake balls over on the Bakerella site (LOVE HER SITE)! She has soooo many neat treats that I'm definitely going to attempt! I've never had a red velvet cake before but thought I'd give them a try and if they turned out good then I'd make more for Valentine's Day. Come to find out...I'm not a fan of the red velvet cake! Oh well.


The recipe is really simple, just takes some time because you have to bake the cake then let it cool completely. Then when that's done you have to crumble the cake, mix it together with 1 can of cream cheese frosting then shape into little balls and stick in the freezer for a few hours.


Next you melt some almond bark and roll the balls in the melted chocolate and set on some parchment paper to cool and harden. With the milk chocolate cake balls I put them in the fridge then melted some white chocolate and drizzled it over the top of them and sprinkled candy cane dust over the tops. I used the rest of the white chocolate to cover the other cookie sheet of cake balls and sprinkled candy cane dust over the tops. I put both sheets back in the fridge to harden up and viola...all done! :)


Even though I don't like the cake, everything tastes better with chocolate and peppermint sprinkled on top! LOL Hubby says he thinks he'd really like these made with a yellow cake mix so that will be my next attempt!

The Bomber Jet

The theme for AWANAS this evening is Drive-In Movie Night so the kids are encouraged to make cars or some sort of vehicle out of cardboard boxes. They'll bring them into the church and sit in them while they watch a movie and eat popcorn. This year I was a BAD mom and waited til the last minute to try to find a box. I called Sears and stopped in everyday this week and had no luck so my DH brought a box home from work that is basically JUST big enough for Keegan to sit in but his legs have to be bent a little. Keegan doesn't seem to care so that's fabulous! I asked him what he wanted to make and he decided on a jet! Now, I'm not one of those parents that takes over the project, I like to let him do most of the construction himself and he tells me how he wants me to help him paint it. Last year I was completely shocked at just how many parents were obviously the builders of their kid's vehicles. A lot of them looked as if their kids hadn't helped at all and that's sad to me! I want Keegan to feel proud of his work and know that it was his creation and that I just helped him! So, needless to say, ours is never one of the more elaborate vehicles! LOL

Here's the builder cutting out the shape of the wings and nose of the jet:


Next it's time for what is probably the most fun part...spray painting:


Now this is where mom gets irritated and starts getting snippety. My wonderful and amazing son has a wee bit of problem paying attention sometimes! He gobbed on a bunch of paint and it ended up getting on his shoes and the ground which then led to getting on his pants and under our shoes which led to trails of red paint on the front porch and one angry mother!


I would like to say that I've been fighting a bad headache all morning so I was extra grumpy (poor Keegan) but we managed to get the jet completely painted and crossing my fingers that it will be dry by the time we have to take him to AWANAS at 6:30pm.


Next year I vow to get a big refrigerator box or something and get started on it at least a week before the movie night...hopefully! LOL

Yummy Letters


It's been one of those crazy kind of days so here it is, 2pm and the kids haven't had lunch yet. I decided to make up some breadsticks and instead of just doing regular plain ol' breadsticks I decided to spell out my son's name with the dough. I had some extra dough so I made a T for Tatym and a circle and then just some little dough bites.

I just used a regular can of Pillsbury breadstick dough and set the oven at 375*. I greased a baking sheet and made out the letters/shapes and put it in the oven for 5 minutes. After the timer went off I covered each piece with butter, sprinkled some italian blend cheese and some garlic salt on the top and put it back in the oven for another 5 minutes. And of course you can never have to much butter on bread, when it was done I spread a little more butter on the top and served them up to the kiddos! Keegan was super excited about it, Tatym on the other hand could care less! LOL


Tuesday, January 26, 2010

Magnets


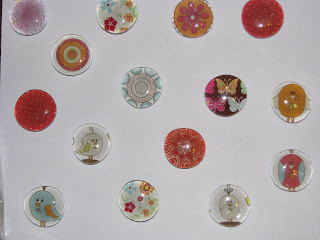
Tonight my project was making magnets! I found some clear, round, glass rocks at JoAnn's. Make sure you get ones with a flat bottom. These are super easy, super cute and make for great gifts and fun for the kids! I just looked through my scrapbook paper and even made good use of some of my scrap pieces. I set the rock on top of the image I wanted on my magnet, traced a circle around the edge, cut it out (cut inside the line for a better fit) and used my CTMH liquid glass to adhere the paper to the rock. Once the liquid glass was dry, I used my exacto knife to trim off the excess paper from around the edge of the rock and then super glued a magnet to the back of the rock and BAM...we have a handmade magnet!
You can click on the picture to enlarge it for better detail. I LOVE the little bird ones...super cute and I know my kids are going to love them!

Monday, January 25, 2010

Bath Crayons and Paint


It's kind of a dreary day on the Oregon coast and I wanted to find something fun for the kids and I to do so I looked online and found some recipes for making our own bath crayons and paint! PERFECT! Just as I was getting ready to write the recipe down my wonderful friend, Sara, text me to see what I was doing so I invited her and her 5-year-old daughter, Karis over for a playdate! Let me just warn you...this stuff is MESS-Y!! If you are a neat freak or get anxiety from having any sort of mess...don't try this at home! LOL

The crayons didn't turn out as good as I'd hoped, I think it's definitely one of those recipes that I have to try out a few times in order to get the kinks out but hey, we all had fun so that's what counts!

What you need for bath crayons is:
Two 3.1oz Bars Ivory Soap (all I used was 1 4.5 oz bar)
Cheese Grator
1 Tbsp Vegetable Oil
3 Tbsp Water
2 Tsp Food Coloring
Wax Paper


Here are the directions:
1. Grate the bars of soap using the smallest hole on your cheese grator
2. Place the soap shavings, vegetable oil & water in a saucepan
3. Heat the ingredients on med-low. Stir constantly with a spoon until the soap melts and the mixture is doughy
4. Mix in the food coloring
5. Remove from heat
6. Spoon the soap out of the saucepan and onto a plate or baking pan. Soak the saucepan and spoon in hot water ( do it right away or it will never come clean )
7. When the soap is cool enough to handle , knead it with your hands for aprox. 1 minute
8. Divide the soap into 4 sections ( or 2 sections for chunky crayons )
9. Roll the soap into log shapes, then roll a piece of wax paper around each log
10. Put the crayons into the fridge to harden ( aprox. 1 hour )

Be sure to wash out the bathtub after the kids use this so it doesn't stain.


This is where I got the recipe!

Here are my wonderful assistants kneading the soap mixture and preparing to roll them into little crayon shapes:


Now onto the paint portion of our show! LOL This one was ULTRA, SUPREME messy but Karis kept saying how much fun she was having and that just makes the mess worth it!

What you need:
2 Tbs. cornstarch
1/4 cup hand/dishsoap
4-5 drops of food color
1 tbsp water

We used a muffin pan for this so we put the cornstarch, soap and food color in each muffin cup, mixed them together. The consistancy is kind of like slime so I used a spatula to scoop it out of the muffin cup and put it into a sandwich bag and then added the water and squished it all together. VIOLA...it's ready to be used!


This would be a great gift to give to friends or kids in your family and I'm pretty certain that next time I won't be using a muffin pan, I'll just mix them in bowls or cups or something so that things aren't spilling over the sides! LOL An adult can make it a lot less messy but the kids have a blast and hey, it's soap so it's easy to clean up! :)

Wahoo...another one!


I got another heart felt VDay decoration made! My fingertips were SO sore after I finished this one that I'm gonna wait a few days before I attempt another one! LOL I'm giving this red one to my grandma on her birthday tomorrow!

Friday, January 22, 2010

Heart Felt Decoration


Ok, so first off, you HAVE to stop by the Idea Room blog! It's my new favorite blog and I can't seem to get enough! I saw this heart felt wreath and knew I had to give it a whirl!

I went to JoAnn's and bought a styrofoam heart and 20 of the 9x12" sheets of shocking pink felt(they didn't have any red).


I had a lid to a can to use for my circle template, it measured 3". In the end I used 16 1/2 sheets of the felt and if I did it just right, I ended up with about 7-8 circles from each sheet.


Each circle was folded in half and then folded in half a 2nd time (sorry, I didn't take a picture of it) and I used a sewing pin at the bottom corner and pinned it to the heart. It took me awhile to figure out how to place each circle but what worked best, for me, was to start on each side and work my way down. It got trickier for me at the top but if you just move things around, you'll figure out what looks good!


And probably like most crafters, I couldn't let the extra pieces of felt go to waste so I cut out hearts which I'll use later for some other Valentines Day decorations!

Thursday, January 21, 2010

Mummy Dogs


Keegan & I made some yummy Mummy Dogs for dinner this evening. For those that have never made these, just grab a tube of fridge breadsticks (we like Pillsbury) and a pack of hot dogs. Set your oven to 375* and take one breadstick, stretch it out a bit and then just wrap it around the hot dog and place it on a greased cookie sheet. Line them all up and bake in the oven for about 8-10 minutes or until golden brown. Eat em up! :)

Who knew??


Who knew just how much fun you could have with mini marshmallows and toothpicks? LOL Keegan and I busted these out while Tatym was napping and Keegan is so proud of his creations that he has them still out on the table, waiting for daddy to get home so he can show off his masterpieces!

Keegan wanted to make a dog but then changed his mind and opted to just make the face:


Definitely keeping this activity in mind for those rainy days we seem to be blessed with a lot lately! :O)

Sunday, January 17, 2010

LOVE


I spent a few hours last night working on this fun little project. I don't think it normally would have taken hours but I was messing around with letter sizes, shadows and settings on my Cricut. Man, I LOVE my Cricut! Anywho...I made this up and it looks fabulous on our mantle! Although the colors aren't your typical Valentines Day colors, the theme of LOVE is obviously perfect for V Day and all year long! :)


Wednesday, January 13, 2010

My favorite peanut butter cookie recipe.


It's a FABULOUSLY stormy day on the Oregon coast and as much as I LOVE a good stormy day, I hate that my hubby has to work outside in it! The upside is that he's an RV salesman so there aren't as many customers that come in on a stormy day but of course the downside is...no customers = no paycheck! Eeeek! So, I figured the least thing I could do to show my hubby how much I appreciate his hard work and how much I love him is to bake him some yummy cookies! I feel bad because we're trying to eat better but I LOVE to bake and hubby LOVES to eat what I bake! :O) See, we're a perfect match! Today I decided to make some Irresistable JIF Peanut Butter Cookies! This is by far my most favorite PB cookie recipe EVER!

Ingredients:
3/4 cup JIF PB
1/2 cup shortening
1 1/4 cup packed brown sugar
3 tbsp milk
1 tbsp vanilla
1 egg
1 3/4 cup flour
3/4 tsp salt
3/4 tsp baking soda

Heat oven to 375*.

Combine PB, shortening, brown sugar, milk & vanilla. Beat until well blended. Add egg & beat until blended. Add flour, salt & baking soda (I don't just dump it in, I add a little at a time, using my mixer the whole time.) and mix until blended. Drop by heaping tsp. fulls 2" apart onto cookie sheet. Flatten slightly in criss-cross pattern with tines of fork (I don't do it all the time). Bake for 7-8 minutes. I bake them until there is a little golden brown color on the tops of the cookies that way when they cool, they are still chewy and oh-so-delicious!!

Tuesday, January 12, 2010

Candy Cane Popcorn


First off, make sure to check out the blog: Skip To My Lou Cindy has so many fabulous crafts and recipes that you just HAVE to try out! I found this recipe for candy cane popcorn and knew I had to give it a whirl! My awesome friend Sara had given us one of those cans that have 3 different kinds of popcorn in it for Christmas, so instead of popping a bag of popcorn, I just had my son fill up a mixing bowl with the butter popcorn from the Christmas popcorn can. I melted a package of vanilla flavored Almond Bark and while I was melting it on the stove, Keegan was all too eager to beat up the candy canes for me in a ziploc bag until there were hardly any solid chunks of candy cane left (about 40 mini candy canes). After the almond bark was melted I added all but about 1/2 cup of the candy canes and mixed it all up. I then dumped the mixture in the bowl with the popcorn, stirred it around until all the popcorn was covered. I then laid out a piece of parchment paper and spread out the gooey popcorn to let it cool and then sprinkled the rest of the candy cane dust over the top. Now, I'm not the most patient person in the world so I opted to put the parchment paper on a cookie sheet and shove it in the fridge to help it cool faster!

This is SUCH a yummy recipe!!! Give it a shot! :)

Monday, January 11, 2010

Yummy Gummi Candy

I'm having one of those days where I don't feel like doing any sit down, worksheet school work with my son so I opted to find something fun to do instead. I found a yummy recipe for homemade gummi candy and Keegan thought it would be fun so off we went to get the supplies. I found a package at Walmart that had several different candy molds in it (it was in the wedding supplies/birthday cake making supplies/candy supplies section). It was only $9 and it came with hearts, flowers, automobiles, fruit, party theme, letters, numbers and 1 or 2 more. I'm being too lazy to get up and go look right now! :)

All you need to make one batch of this gummi candy is:
2 envelopes (1/4oz each) of unflavored gelatine (I used Knox brand...over in the jello section)
1 box (3oz) flavored jello (I used generic)
1/3 cup water
candy molds although I'm sure ice cube trays would work just as good


Start by putting 1/3 cup water into a small saucepan, add the jello & gelatine, mix together and let sit for 5-10 minutes.
Place saucepan on medium heat and stir until liquid consistancy.
Let cool for a minute and place in something for easy pouring. You could use a small ceramic pitcher but I didn't have one. I just used a paper cup that I could pinch the end and it worked wonderfully. Pour into candy molds (no need to grease the molds) and place in the fridge for about 10 minutes. When you go to take the candy out of the molds, I just used a toothpick to pull up the edge and then peeled it out. Don't worry about breaking them, they are TOUGH little things!

ENJOY!!!


Keegan chose to test out orange and I tested out cherry and both were really good!